

You measured twice, cut once, and stepped back with pride for your new deck. Then a few months later, the gap between boards grew wide and messy. Or maybe the opposite happened: the boards swelled up and pushed against each other, causing the whole deck to buckle.
Most guides just tell you to leave this space and move on. But wood just doesn’t work. A board that just came from the treatment plant behaves differently than one that’s been sitting and drying out for weeks. Using the wrong gap for the wrong type of wood is where most spacing problems start.
This guide will show you exactly how to space both wet and dry deck boards, so your deck stays flat and lasts for years. Let’s get started.
Why Deck Spacing Depends on Moisture?
Wood is ‘hygroscopic,’ that absorbs and releases moisture depending on the air around it. It swells when wood soaks moisture. And on drying out, it shrinks. This is not something that happens once; it keeps happening as the seasons change.
Freshly cut lumber usually starts very wet. According to the USDA Forest Products Laboratory’s Wood Handbook, the average moisture content of common softwoods used in construction is around 26%. That means there is a lot of water sitting inside the board.
This moisture moves out into the surrounding air until the wood reaches equilibrium moisture content over time. It is the point when wood stops gaining or losing moisture from the air. Below are the seasons when the equilibrium point is not fixed.
- Humid summer months: During those seasons, the air holds more moisture. So wood absorbs some of the water and gets slightly swollen.
- Dry winter months or arid climates: Air pulls moisture out of wood, which makes it shrink again in dry seasons.
- Rainy or coastal regions: In rainy regions, wood stays in the swollen state for longer stretches of the year.
- Consistently low-humidity regions: Wood that settles near a low-humidity region maintains a stable moisture level over time.
Thus, deck boards do not have a constant moisture level. They constantly adjust this level in small ways with weather, season after season. This constantly changing level is exactly why spacing cannot be reduced to one fixed number. A board’s width today reflects its moisture content today, not its moisture content four months from now.
How to Tell If Your Boards Are Wet or Dry?
Before knowing the deck board spacing, it is important to first learn how to identify whether the board is wet or dry. Here are the three most common ways to know your deck boards.
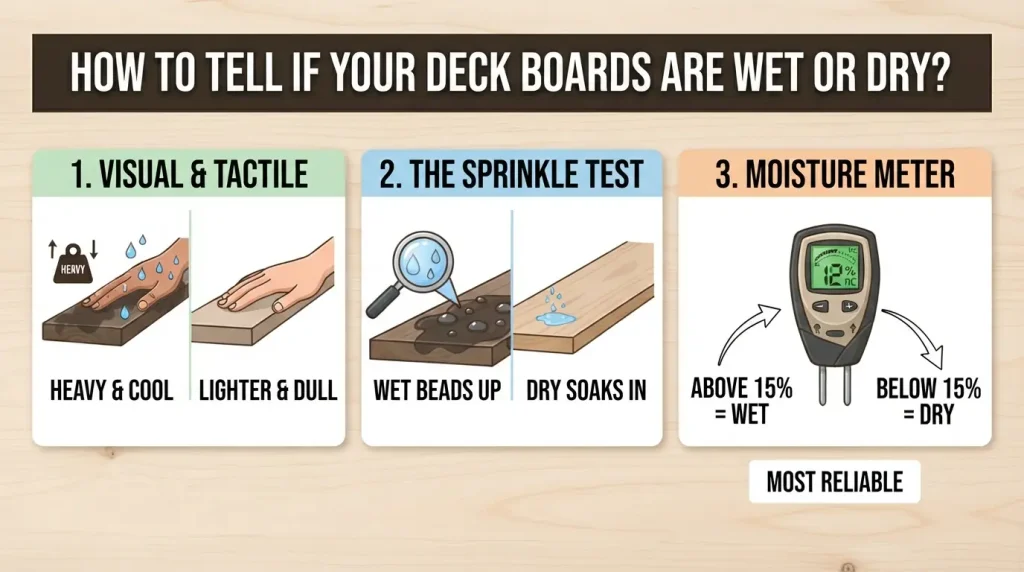
1. Visual and Tactile Cues
The visual appearance of wood tells a lot about the moisture content in it. Just note the below-mentioned characteristics.
- Weight: The weight of deck boards tells everything about it. Wet boards feel noticeably heavier than dry ones. If you are lifting boards and your arms are tired faster than expected. It is a sign of higher wet content.
- Feel: Wet boards often feel cool and slightly damp to the touch. It leaves moisture sometimes on your hands.
- Treatment sheen: Freshly pressure-treated lumber often has a shiny surface. Beads of liquid also appear near the ends or where it’s been cut. Conversely, dry lumber looks duller and feels like typical wood.
These visual cues are useful for a quick first impression. But they are not precise. If you want to go beyond a rough guess, use any of the methods below.
2. The Sprinkle Test
The sprinkle test is a quick and simple tool to find out the moisture content in the deck boards. Follow the steps below to perform this test.
- Take a small cup of water.
- Then, sprinkle a few drops of water on the surface of the deck board.
- You have to wait 15 to 30 seconds and see what happens.
- If the water beads up and sits on the surface, it means the board has a lot of moisture. Consider it a wet board.
- But if the wood soaks the water quickly, then it is clear that it is dry.
However, this test is not scientific, but a practical way to check multiple boards quickly.
3. Moisture Meter Method
If you want to get a more reliable reading, then this moisture meter method is the best approach. In this method, you just have to press the meter’s pin into the board, and it gives you an exact percentage of the moisture content.
- If the moisture content is below 15%, treat it as a dry board.
- If the percentage is above that, consider this board wet and treat it accordingly.
This moisture method is perfect for larger decks where getting the spacing right across dozens of boards really adds up.
| Sign | Wet Board | Dry Board |
| Weight | Noticeably heavy | Lighter, easier to carry |
| Surface fee | Cool, damp, sometimes shiny | Dry, dull, rougher texture |
| Sprinkle test | Water beads on surface | Water soaks in quickly |
| Moisture meter reading | 15%+ | Under 15% |
| Installation approach | Install tight, let it shrink into place | Install with a standard gap |
Once you know which type of board you are using, you can move on to the actual spacing guidelines that we are going to cover in the next section.
Spacing Guidelines for Wet Deck Board
Spacing guidelines for wet boards are completely different from dry wood. If you get more than 15% on your moisture meter, follow the instructions below for installation.
● Install Then Tight With No Gaps
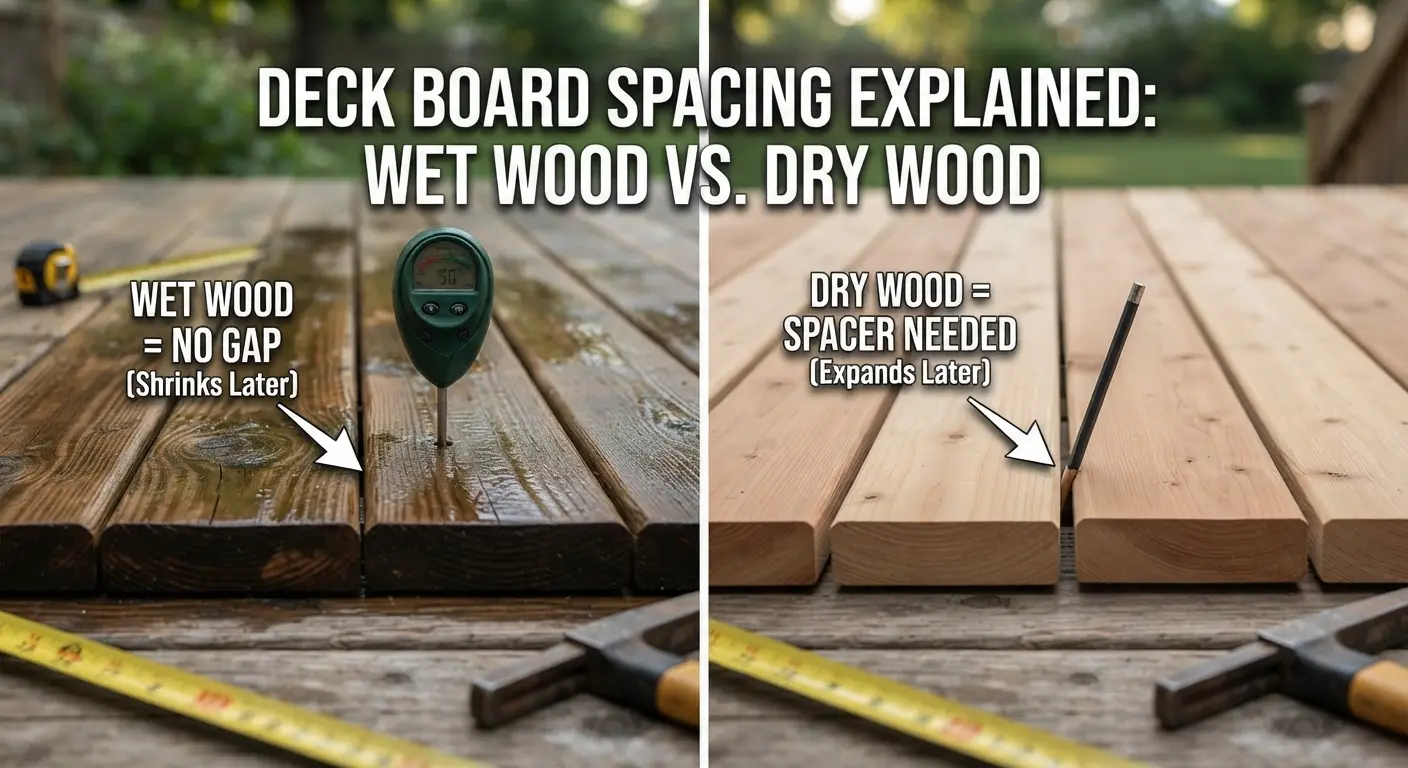
Install the wet boards tight against each other with little or no gap at all. This might feel contrary to the blanket rule, which says to leave 3/16 inch, but it makes sense once you understand what’s inside the wood.
Wet boards are full of moisture that is present within them at the moment. When this moisture evaporates during the dry season, the wood shrinks, which creates a gap for you. If you space wet boards tightly, the natural drying process creates spacing on its own. On the other hand, if you install wet boards with a built-in gap, then this gap gets wider as the wood continues to shrink.
● Realistic Shrinkage Expectations
Boards don’t shrink equally from all directions. Here is an explanation of how a deck board’s dimension changes once it gets dry.
- Width: It is the place where most noticeable shrinkage happens. A board can lose a significant fraction of an inch across its width during dry seasons.
- Length: Wood slightly shrinks in its length, which is negligible for a standard deck board.
That is why the gap that forms between wet boards is more prominent along the long edges of each board, not at the butt joints.
● The Risk of Guessing Wrong
One thing that you must take into account while installing wet boards on your construction site is the risk of guessing wrong. If you assume a board is wet and install it without any gap, but it turns out to be dry. Then you will not get the shrinkage you were expecting. The boards stay close to each other, and you are left with tighter spacing than intended.
Therefore, it is important to be sure about whether the board is wet or dry. A quick sprinkle test or moisture meter reading takes a few minutes. But it prevents you from installing an entire deck section based on a wrong assumption, which is expensive to correct later.
Still worried about getting the guesswork wrong on your decking project? Skip the uncertainty with our framing estimating services. Our professionals handle everything for your decking project, from assessing moisture content in your wood to planning for a long-lasting finish.
Spacing Guidelines for Dry Wood
If a moisture meter reading shows less than 15% water content, the spacing guideline approach completely flips. Dry wood has already lost its water content, so you must keep a gap in them rather than relying on the wood to create it for you.
The Standard Benchmark: 3/16 Inch
The standard benchmark gap between dry boards is 3/16 inch. However, this gap varies slightly across manufacturers and installations, typically ranging from ⅛ inch to ¼ inch.
The following are the reasons for this range’s existence.
- Species Differences: Denser hardwoods move less than softer wood, so they require a slightly tighter gap.
- Regional Climate: In humid regions where wood swells more in summer, a slightly wider gap is required to allow wood boards to settle down. In dry weather, a tighter gap works fine.
- Board Width: Wider boards expand and contract more than narrower boards, so installers usually keep the gap size larger for wider boards.
Note: If you are unsure how much gap you should keep, 3/16 inch is a well-tested default number for most dry softwood.
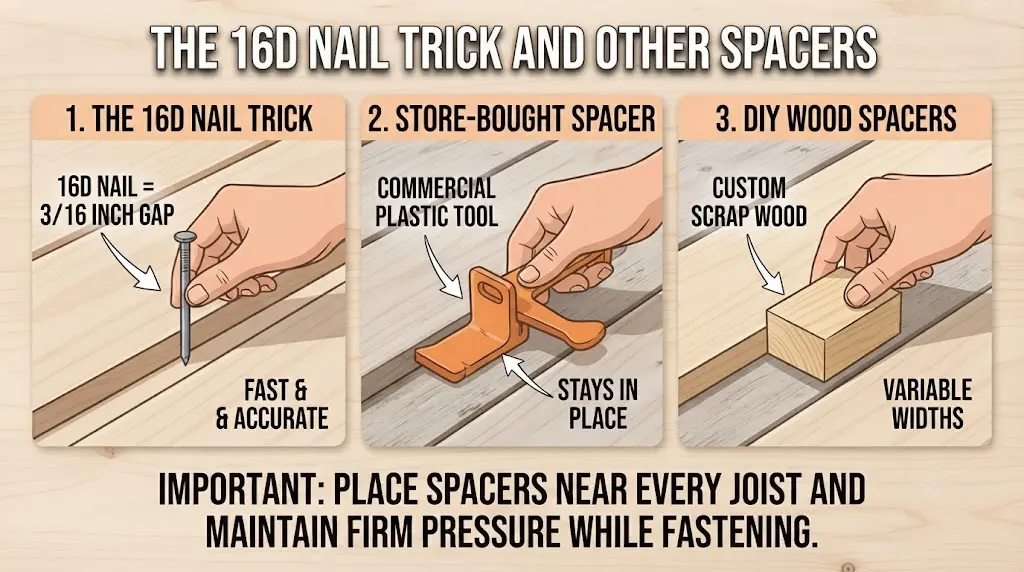
The 16D Nail Trick and Other Spacers
You don’t need any expertise to get the exact spacing for these boards. The options mentioned below can work well for you:
- The 16D Nail Trick: A 16d nail is a good option to measure exactly 3/16 inch in diameter. Placing one on its side between boards as you install them gives you a fast and surprisingly accurate spacer.
- Store-bought Deck Spacer: Plastic and rubber spacers are available in the market specifically designed for decking. They are reusable and often shaped to stay in place while you work.
- DIY Wood Spacers: Cut small strips of scrap wood to your target thickness. This method works well if you want a custom width not covered by standard tools.
Whichever method you use, place every spacer near each joist as you go and keep firm pressure on the board while fastening so the gap doesn’t shift.
Don’t Forget the End-to-End Gap
Most installers only focus on the side-to-side gap between boards but don’t consider the gap at butt joints where two boards meet end-to-end. Even though wood shrinks far less along its length than across its width, this gap still matters but is most of the time overlooked.
To accommodate this gap, follow the guidelines below.
- Leave ⅛ inch at butt joints of two wood deck
- Where a board’s end meets a solid structure, leave ¼ inch to allow for movement without the board pushing against the structure.
Skipping this gap will not cause any dramatic shrinkage, but it prevents boards from buckling as humidity and temperature shift throughout the year.
Here is a quick reference decision table to help you know about your deck boards.
|
Your Situation |
How to Check |
Side-to-Side Gap |
End-to-End (Butt Joint) Gap |
| Wet / freshly treated wood | Feels heavy, damp, shiny surface; water beads on sprinkle test; moisture meter reads 15%+
|
0 to 1/16″ (install tight) | 1/16 to 1/8″ |
| Dry/seasoned wood | Feels light, dull surface; water soaks in on sprinkle test; moisture meter reads under 15% | 3/16″ (standard), 1/8″–1/4″ range depending on species/climate | 1/8″ (1/4″ against walls or structures) |
| Dense hardwood (ipe, cumaru, garapa) | Naturally low-movement species, regardless of wet/dry test | 1/8″ to 3/16″ | 1/8″ |
| Unsure / no meter available | Can’t confirm moisture level | Use the sprinkle test first — when in doubt, treat as wet and install tighter | Same rule applies |
Climate and Regional Considerations for Board Decking
Moisture content is not just related to the boards themselves; where you live also plays a big role. A 2026 decking guide from Board Calculate notes that a kiln-dried softwood board delivered at 18% moisture content can still lose 2-3 mm of width in its first summer. It is proof that regional climate matters even after initial testing.
1. Humid and Coastal Climates
In areas with high humidity round the whole year, wood tends to hold onto more moisture. Boards in these regions:
- It takes longer to reach a stable and dry state.
- Many boards swell slightly again during humid stretches, even after initial drying.
- Often benefit from spacing on the wider end of the range to leave enough room for that ongoing seasonal swelling.
2. Dry and Arid Climates
Wood dries out faster and reaches a lower equilibrium moisture content overall in dry regions. The usual behavior of boards in these areas:
- Shrink more predictably and reach a stable size sooner.
- Need a tighter gap because there is less risk of major swelling later.
- Still require enough gap for drainage, even though shrinkage itself is less dramatic.
3. Regions With Big Seasonal Swings
Areas with extreme hot summers and cold winters have the most movement of the wood throughout the year. Boards in these regions expand and contract noticeably between seasons, so:
- A mid-range gap around 3/16 works best in this climate because it accounts for movement in both directions.
- Spacing decisions made in one season should be reconsidered to account for how these boards behave in the opposite season with completely different circumstances.
Key Installation Tips for Consistent Spacing
Decking is a key task during the construction work. However, you must ensure a consistent deck board spacing for seamless installation. A few practical habits make it much easier to keep your gap consistent across the whole deck. These tips include:
- Skipping spacers on a few boards to save time is where most uneven gaps start. Whether it is a 16d nail or a scrap wood strip, place it at each joist as you go.
- Drawing a chalk line every few feet gives you a straight reference to keep boards aligned, especially over longer runs where small gap errors can add up into a visibly crooked deck.
- Most boards have a slight bow along their length. Therefore, it is important to install them with a crown facing up because gravity helps them flatten over time.
- Check your spacing every few boards rather than at the end, so small inconsistencies get caught early instead of compounding across the whole deck.
Getting the spacing right also depends on getting your material quantities right from the start. Not sure how many boards your project needs? Get an accurate estimate from Lumber Estimator exports and take the guesswork out of your next deck.
Conclusion
Getting deck spacing right is not about memorizing one magic number; it is knowing what your wood encompasses before you install it. Wet boards need to go in tight and let the natural shrinkage create the gap over time. Dry boards need the gap to be built in from the start to get consistent spacing.
Add in your local climate and the season you are installing in, and you get everything to install decking successfully. Furthermore, it is good to take a few extra minutes to test your wood before you start. This small step saves you from redoing boards and living with a deck that never quite looks right.
Frequently Asked Questions
What is a good spacing between deck boards and why is it important?
The ideal gap between deck boards is ⅛ inch to ¼ inch. This precise spacing is important for the following reasons:
- It allows rainwater and melting snow to drain properly.
- Good spacing promotes airflow to prevent wood rot.
- It lets small debris fall through the surface.
- You can also accommodate the natural expansion and contraction of the wood boards during seasonal weather changes with good spacing.
What happens if I space wet wood boards as if they were dry?
If you space wet wood boards as if they were dry, they will shrink significantly as they dry out and leave excessively large gaps up to ⅜ inch wide. This extra gap causes the following things:
- Creates serious hazards
- Traps high heels
- Exposes the structural joints
- Allows large items to fall right through
Can I use a moisture meter instead of the sprinkle test?
Yes. You can use a moisture meter instead of the sprinkle test because this meter is more reliable. It gives an exact percentage reading: aim for under 15% before treating boards. A sprinkle test is indeed a quick and free estimate, but a meter removes the guesswork and is best for high-visibility deck projects.
Can I fix my deck boards that are already installed with the wrong spacing?
If you caught this problem early before boards fully dry and set permanently, you can pull and re-space them. Once wood has shrunk and settled long-term, you need to replace the affected board for full correction. Catching the issue within the first few weeks makes fixing it easy.
How long does it take for wet deck boards to dry and shrink into place?
Most pressure-treated wood dries and shrinks within 4 to 8 weeks in warm weather conditions. It can take a few months in cold or humid seasons. However, full stabilization sometimes takes up to a year. Therefore, checking moisture content periodically gives a more accurate timeline than guessing by season.